TransformコンポーネントのInspectorにリセットボタンを追加する方法
この記事では、UnityでTransformコンポーネントのInspectorにリセットボタンを追加するエディタ拡張の作り方について説明します。
作り方
Editorクラスを継承する
Editorクラスを継承したクラスを作ります。
using UnityEditor;

public sealed class TransformInspector : Editor
{
}
属性を付与する
複数の選択を可能にするCanEditMultipleObjects属性と、拡張するコンポーネントを指定するCustomEditor属性を付与します。
using UnityEditor;
using UnityEngine;

[CanEditMultipleObjects]
[CustomEditor( typeof( Transform ) )]
public sealed class TransformInspector : Editor
{
}
メンバ変数と定数を宣言する
関数の実装に必要となるメンバ変数と定数を宣言します。
private static readonly GUIContent      PROPERTY_FIELD_LABEL    = new GUIContent( string.Empty );
private static readonly GUILayoutOption RESET_BUTTON_WIDTH      = GUILayout.Width( 20 );
private static readonly GUILayoutOption VALUE_FIELD_HEIGHT      = GUILayout.Height( 16 );

private Transform           m_transform;
private SerializedProperty  m_position_property;
private SerializedProperty  m_scale_property;
OnEnable関数を定義する
必要な値を取得するため、OnEnable関数を定義します。
private void OnEnable()
{
    m_transform         = target as Transform;
    m_position_property = serializedObject.FindProperty( "m_LocalPosition" );
    m_scale_property    = serializedObject.FindProperty( "m_LocalScale" );
}
TransformのUIを描画する関数を定義する
ここで新たなusingディレクティブが必要となるため、下記のコードを一番上の行に追加します。
using System.Collections.Generic;
using System.Linq;そして、TransformのUIを描画する関数をそれぞれ定義します。これらの関数にリセットボタンを追加する( 描画する )処理も含まれています。
座標のUIを描画する関数
private void DrawPositionUI()
{
    using ( new EditorGUILayout.HorizontalScope() )
    {
        var is_pushed_reset_button = GUILayout.Button( "P", RESET_BUTTON_WIDTH );
        if ( is_pushed_reset_button ) m_position_property.vector3Value = Vector3.zero;

        EditorGUILayout.PropertyField( m_position_property, PROPERTY_FIELD_LABEL, VALUE_FIELD_HEIGHT );
    }
}
回転のUIを描画する関数
private void DrawRotationUI()
{
    var new_value  = Vector3.zero;
    var transforms = targets.Cast<Transform>().ToList();

    EditorGUI.BeginChangeCheck();

    using ( new EditorGUILayout.HorizontalScope() )
    {
        var current_value                   = TransformUtils.GetInspectorRotation( m_transform );
        var is_pushed_reset_button          = GUILayout.Button( "R", RESET_BUTTON_WIDTH );
        var contain_difference_rotations    = containDifferenceRotationsInSelectedObjects( transforms, current_value );

        if ( contain_difference_rotations ) EditorGUI.showMixedValue = true;
        var field_value = EditorGUILayout.Vector3Field( string.Empty, current_value, VALUE_FIELD_HEIGHT );
        if ( contain_difference_rotations ) EditorGUI.showMixedValue = false;

        new_value = is_pushed_reset_button ? Vector3.zero : field_value;
    }

    if ( EditorGUI.EndChangeCheck() )
    {
        Undo.RecordObjects( targets, "Inspector" );
        transforms.ForEach( transform => TransformUtils.SetInspectorRotation( transform, new_value ) );
    }
}

private bool containDifferenceRotationsInSelectedObjects( IList<Transform> transforms, Vector3 current_value )
{
    if ( transforms.Count <= 1 ) return false;

    return transforms.Any( transform => current_value != TransformUtils.GetInspectorRotation( transform ) );
}
大きさのUIを描画する関数
private void DrawScaleUI()
{
    using ( new EditorGUILayout.HorizontalScope() )
    {
        var is_pushed_reset_button = GUILayout.Button( "S", RESET_BUTTON_WIDTH );
        if ( is_pushed_reset_button ) m_scale_property.vector3Value = Vector3.one;

        EditorGUILayout.PropertyField( m_scale_property, PROPERTY_FIELD_LABEL, VALUE_FIELD_HEIGHT );
    }
}TransformのUIを表示する3つの関数の中で、回転の関数( DrawRotationUI )のみコードが長いです。これは回転のSerializedPropertyの値をQuaternion型で保持しているためです。
それにより、回転の関数は、座標( DrawPositionUI )や大きさ( DrawScaleUI )の関数と同じようにEditorGUILayout.PropertyField関数を使用して実装することが難しくなります。そのため、その部分をEditorGUILayout.Vector3Field関数を用いて実装する形に変えており、結果としてコードが長くなっています。
OnInspectorGUI関数を定義する
Inspectorの描画を上書きするため、OnInspectorGUIを定義します。これでエディタ拡張のプログラムは完成です。
public override void OnInspectorGUI()
{
    serializedObject.Update();

    DrawPositionUI();
    DrawRotationUI();
    DrawScaleUI();

    serializedObject.ApplyModifiedProperties();
}
使い方
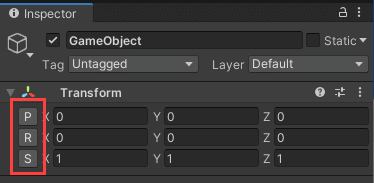
上記のプログラムを作成すると、Transformの各項目( 座標・回転・大きさ )に対する入力欄の左側にボタンが表示されます。
このボタンを押すと、押した項目の値をリセットできます( 項目が座標か回転であればX・Y・Zの値を「0」に。大きさであればX・Y・Zの値を「1」にします )。